Boat rebuild – Phase 1 & 2

  • patk
    Nisswa, MN
    Posts: 1997
    #1355130

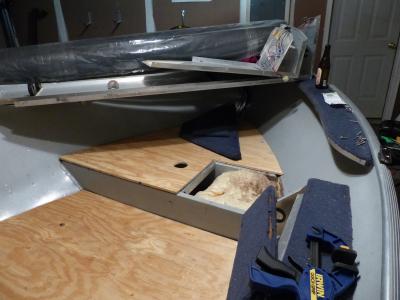
    It’s been a month since my last post and making headway. Slow but sure seems to be the pace with the emphasis on slow

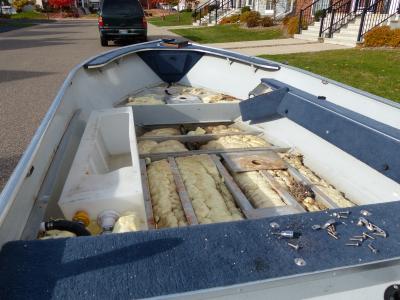
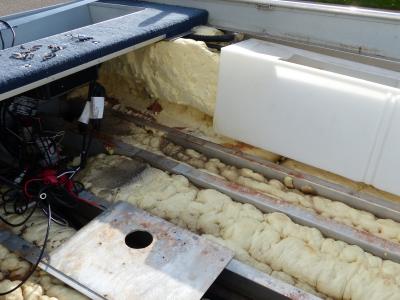
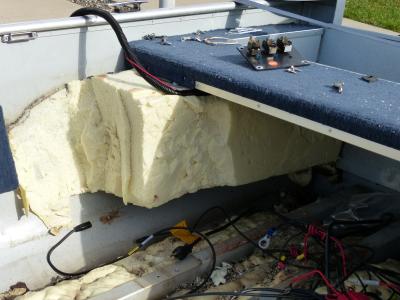
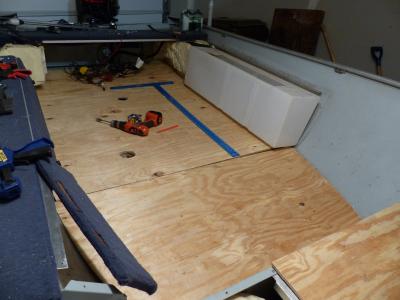
    The basic project is to replace the old floor as it has rot issues. Based on guesswork I figured a few hours to remove the old floor. The good news is that the old floor is out. In the process I learned that during the original build spray foam was applied after many of the steps. Locked a few things in place.

    Had to chip and cut out a bunch of the foam and the pics are the “after”.


    patk
    Nisswa, MN
    Posts: 1997
    #1366379

    Phase 2 is halfway. Took a little time off but got back into it this weekend.

    Got the hull cleaned up, scraped off the rotted wood from the frame, and got my replacement boards cut.

    Was supposed to carpet tonight but hit a small snag. The later this project goes, the colder the garage gets. According to the directions I’m going to need to be above 65 degrees for the adhesive. The fw wasn’t real keen to “remodeling” our living room into a shop tonight so maybe tomorrow

    The goal is to get the boards carpeted and everything ready to fasten before Thursday. Take a holiday break out of town and then start putting some of the other pieces back together.

    I’m on a false deadline of the 2nd weekend in December. Need the garage back for parking the cars with winter here. Done or not I’m taking it up to the cabin and getting the ice gear out!

    mark-bruzek
    Two Harbors, MN
    Posts: 3837
    #1366381

    If you round the edges a bit with router or sandpaper the carpet will not wear through as fast from the sharp edge.

    Is that treated ply?

    patk
    Nisswa, MN
    Posts: 1997
    #1366387

    Quote:


    If you round the edges a bit with router or sandpaper the carpet will not wear through as fast from the sharp edge.
    Is that treated ply?


    Yes and no for treated ply. In my research there were multiple reports that the chemicals used to green treat were harmful to aluminum. I got exterior grade ply and put some Thompson’s water seal on it.

    Thanks for the tip on the corners. The blue carpet in the pics is 25 years old. I basically am copying the original boards but I think I’ll take your suggestion.

    kwp
    Eden Prairie
    Posts: 857
    #1366389

    You will have a real nice boat when you finish it all up

    belletaine
    Nevis, MN
    Posts: 5116
    #1366397

    Quote:


    If you round the edges a bit with router or sandpaper the carpet will not wear through as fast from the sharp edge.
    Is that treated ply?


    I helped a buddy do this to his Crestliner years ago and we hit the edges with a sander for just that reason.

    eyekatcher
    Lakeville, MN
    Posts: 888
    #1366399

    When I did mine,
    I used the old boards as a template to cut
    and drill for the rivets.
    Then I used every Philips screw driver I had to line up all the holes
    to the hull before setting any rivets.
    Worked real sweet.

    eyekatcher
    Lakeville, MN
    Posts: 888
    #1366402

    The best thing to use is marine ply.
    I used that and two coats of spar varnish both sides and edges. Picked up the marine ply at Menards for $49 a sheet a couple years ago on sale.
    The fasteners can also cause problems.
    Make sure the fasteners are compatible with the attachment point. Aluminum to aluminum, etc.

    Chuck Melcher
    SE Wisconsin, Racine County
    Posts: 1966
    #1366420

    Looks like a great project. Always thought it would be fun to have an off-season rehab challenge like that.

    Brian Hoffies
    Land of 10,000 taxes, potholes & the politically correct.
    Posts: 6843
    #1366428

    Looks good so far. Pat if you need a heated shop to do the carpet shoot me a PM. If you are willing to drive to Princeton you can use my shop some evening.

    patk
    Nisswa, MN
    Posts: 1997
    #1366570

    Quote:


    When I did mine,
    I used the old boards as a template to cut
    and drill for the rivets.
    Then I used every Philips screw driver I had to line up all the holes
    to the hull before setting any rivets.
    Worked real sweet.


    That’s a good idea. I’ve been debating trying to use the old holes. Option B, drill all new holed and don’t bother to line anything up.

    Good news is that hte old boards came out 90% intact. Bad news is I followed those as a template and have a couple crooked cuts I have to hide:(

    patk
    Nisswa, MN
    Posts: 1997
    #1366571

    Brian – Big thanks for the offer. I’ll let you know if I need help!

    Jakob
    Keymaster
    Rogers
    Posts: 1282
    #1366725

    Awesome! Same exact boat as mine – I remodeled last winter!
    Looks like your making some progress – nice work!

    Link: Rebuild

    patk
    Nisswa, MN
    Posts: 1997
    #1366836

    Quote:


    Awesome! Same exact boat as mine – I remodeled last winter!
    Looks like your making some progress – nice work!

    Link: Rebuild


    I read all your posts before starting mine. That was a big help! I think the only difference between ours is the lenght. Mine is a 14.

    FYI – not as many gadgets coming in my build but I am going to add lights based on what you did.

Viewing 14 posts - 1 through 14 (of 14 total)

You must be logged in to reply to this topic.