Yamaha T8 trim/tilt problem

  • Smellson
    Posts: 306
    #1759784

    Ive got a 2003 yamaha t8 that im experiencing issues with. I was able to tilt the motor down no problem but when I went to trim up, it wouldnt move. I could hear the electric motor running (slightly different sound than normal) but the motor didnt go anywhere. I was able to get the motor to raise by repeatetly hitting the trim up switch, moving a small amount each time I pressed the button. After it got warmer out the trim started to work fine again? I made sure the trim fluid wasnt low and re-bleed the system to make sure that wasn’t the problem. Ive read online that these motors are notorious for trim problems but havent been able to figure out if it is a new electric motor that I need or if its the hydraulic pump that needs to be rebuilt/replaced. I took the cover of the electric trim motor and it looks practically brand new inside with no visible corroison or signs of leaks. Anybody been through this process and find a good solution?

    Thanks!

    slowpoke
    Perham Mn
    Posts: 238
    #1759796

    I had problems with my 2006 t8 and it turned out to be the trim switch. Same thing it would go down but not up. Pump would run but no lift. Switch was weak on the up side.

    BrianF
    Posts: 657
    #1759800

    I have the exact motor and had the exact problem as the OP last year. I had to replace the entire trim motor. Wish it was only the switch.

    Smellson
    Posts: 306
    #1759812

    Thanks for the info so far! I’ve got the entire trim assembly off the motor now and have tested the motor with the leads connected directly to a battery, so I know its not a relay/switch problem (unfortunately). Initially assumed it was the trim motor but had read of a few people replacing some springs and valves/seats in the hydraulic portion which caused me to second guess myself.

    SuperDave1959
    Harrisville, UT
    Posts: 2816
    #1759842

    I had to replace my trim assembly last year to the tune of $1,100. On our generation of T8’s there are some internal seals that are virtually impossible to get to. Had the price been any higher, I would have probably just bit the bullet and went with a new T9.9. I’m crossing my fingers that by the next time the T8 takes a dump that Yamaha has started making EFI kicker motors.

    Tom P.
    Whitehall Wi.
    Posts: 3452
    #1759891

    I had the same problem on my T8 it is in the hydraulic control valves very common problem on some T8`s. I ordered the rebuild parts and if memory serves me about $200 they are an upgrade. They do not offer a kit so all parts need to be ordered separately it has been 6 years since I did mine and never a problem since. When I get home on my PC there I think I have the list yet with part numbers. Much cheaper then replacing and not terribly difficult.

    Smellson
    Posts: 306
    #1759958

    Thanks Tom P! That would be great if you could get me the part numbers. I took the pump and housing off but when I got to the valves I couldnt figure out how to even remove them? Looked like it was just a round disk covering them that would need to be removed but I couldnt figure out how to get them out. If you have any advice on that, im all ears!

    Tom P.
    Whitehall Wi.
    Posts: 3452
    #1760267

    Here is a link to my old post with part numbers

    2001 T8 Trim Acting Up

    igotone
    Posts: 1744
    #1760331

    can’t get link to work
    would like all your info also Tom

    Thanks in advance

    Smellson
    Posts: 306
    #1765124

    Just an update: I ended up purchasing all the parts tom p had mentioned and it works like new again! If you’re having this same issue I suuggest opening up the electric trim motor and even just visually inspect it. Mine looked spotless so I assumed the trim motor was still good (it was). It appeared on my unit that one of the springs had pushed through the wire filter and was causing the valve to stick. The new parts list adds a spacer that should prevent that in the future. Overall not terribly difficult to fix when I got all the parts, but there are numerous small parts to keep track of when you disassemble the hydraulic pump assembly so be careful. Best part is it only ended up costing roughly $100 instead of the $1000 for the whole trim assembly.

    igotone
    Posts: 1744
    #1765138

    Smallson,
    Can you tell me the parts list and where you got them?
    can PM me if you would, then I will have it saved.

    Thanks in advance

    Smellson
    Posts: 306
    #1765139

    Valve Seat 69G-4382G-00-00 = X2
    Main Spring 69G-43853-00-00 = X2
    Filter 3 69J-4381C-00-00 =X2
    Spacer 69G-4388F-00-00= X2

    Bought them all from boats.net for around $100 or so.

    Tom P.
    Whitehall Wi.
    Posts: 3452
    #1765261

    When I fixed mine it took me months to get that parts list put together, as everyone I talked to (mechanics ) they just replaced the entire unit even the parts guys had no real clue what was needed. Finally found a place in Eugene Oregon that there mechanic rebuilt everyone that came in and he gave me all the numbers and sent me the parts. I cannot for the luv of me remember how I got the name of the place.

    David P
    Green Bay, WI
    Posts: 18
    #1771415

    Hey guys, mine blew out yesterday the 29th. This is the 2nd 2003 T8 i’ve had that has had this issue. My current T8 is T8PLHB. Looking at the diagram here: http://www.boats.net/parts/search/Yamaha/Outboard/2003/T8PLHB/POWER%20TILT%20ASSY/parts.html, you’d be talking parts 32 thru 36. Correct? Definitly isn’t the relay. Motor has less than 400 hours on it. hmmm

    I haven’t taken it off the motor yet, so any help is really appreciated.

    Smellson
    Posts: 306
    #1771433

    It’s essentially those same parts but the updated parts off of the newer t8s (2006?and newer) essentially they put a spacer in above the filter(screen) to prevent the spring from pushing through the filter.

    David P
    Green Bay, WI
    Posts: 18
    #1771454

    thank you. looks like a tear down in the very near future. Odd thing is i had sold my 2003 Lund 2025 w/ the T8 2yrs previous for 03 621 w/ same T8. I took off the Tilt and Trim from the lund 4yrs ago and it sat on the shelf. After 2 years, the new owner of the Lund stopped over 4 weeks ago to pick it up. Tom if your reading this, here’s the fix for that Tilt and Trim. Ha! When ever i get it done, i’ll update on the status of the 03 T8PLHB.

    David P
    Green Bay, WI
    Posts: 18
    #1771573

    After digging into the value, i hit a wall. the diagram shows the part as the circlip but i don’t think that’s what it is. I’ve added a pic of the valve part and the object that needs to be removed. I just don’t know how to get it out. In the center, it appears to be a pin plunger. Anyone know how to remove it? i can put my finger nail down the side a little so i know the gold ring doesn’t appear to be a circlip. Any help on the final disassembly would be greatly appreciated!

    Attachments:
    1. t8plhb_Dissected.jpg

    Smellson
    Posts: 306
    #1771601

    Compressed air…combination of shooting air through one of the holes in the top left of your picture and covering the relief holes. It makes a mess figuring out which holes are the trim up and down but essentially just need to get air behind that brass piece. There is an option ring around the brass piece so not a ton of pressure holding them in the holes

    David P
    Green Bay, WI
    Posts: 18
    #1773993

    ok, finally back in the motor and working correctly. Ordered parts spacer: 69G-4388F-00-00 x2 and filter: (to replace the damaged ones) 69J-4381C-00-00 x2. I had looked at the other parts but the Valve Seat and the Seat Valve are on backorder. So, i ground .035 off the Valve Seat and then cut 5 rings off the spring (main valve spring) to allow the Seat Valve to depress. Took a while to prime the T&T but very happy to get this resolved. Total cost = $60 with shipping. Thank you all for your input!

    David P
    Green Bay, WI
    Posts: 18
    #1786889

    Thought i’d log in and give a final. The fix worked and I’m able to tilt and trim the T8 up and down through out the summer. Thank you for everyone that replied and started/add to this post.

    Regards,
    David

    mike marshall
    Posts: 1
    #1983711

    Hi Tom,

    the parts list contains =1, =x2 Do these mean you need two of those items?

    Thank you

    Tom P.
    Whitehall Wi.
    Posts: 3452
    #1983781

    Hi Tom,

    the parts list contains =1, =x2 Do these mean you need two of those items?

    Thank you

    Yes if I remember right it has only been forever since this post started and my T8 trim still working like new.

    Chris
    Posts: 1
    #1985931

    Hi, I have the parts but when I took the assembly apart all the parts fell out. Is there a good diagram that shows how to get it back together? All I can find is a poor quality one with very little detail.
    Thanks

    Arthur K
    Posts: 1
    #2023464

    Hi All,

    I just wanted to add a few comments suggestions to people that have/are encountering this issue. The parts list Tom P and Smellson provided is money. A few things to keep in mind for anyone else going through this. The fill hole is the flat head head screw, not the allen above it (generally never need to touch the allen screw). Overfilling can cause seal failure or can split the housing. We were told that AW-32 hydraulic oil is better than ATF because ATF can cause seals to wear over time if they don’t have viton in them, which these don’t. After reassembling (I agree with being careful on disassembly as there is a lot of little parts) you will need to keep adding fluid (through the flathead screw hole) until it functions up and down properly. My unit would only go up a few inches at first but then I would add a little more fluid (aw-32) and then it would got a little higher, and repeat this until its full to the top of the flathead hold and trims up and down normally.

    If you aren’t sure of your mechanical abilities, I would recommend sending your unit to 5 star Marine. The owner, Devin, is awesome and has excellent customer service and they can turn them around in 4-5 business days. They also rebuild with higher quality parts than OEM. I hope this helps someone else!

    #2045452

    Hello, I have had the same issue as everyone on here. I took it apart and unfortunately as I was doing so the little balls, springs, and pins fell out before I could take a picture. Anyone have a picture of where the balls and pins go? Like stated before the parts diagram isn’t very good.

    Michael Gieseke
    Posts: 1
    #2132859

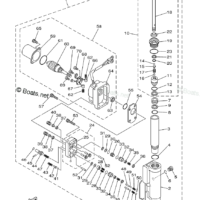
    I just did this repair and wanted to add a few comments. The parts list is accurate:

    Valve Seat 69G-4382G-00-00 = x2 (two)
    Main Spring 69G-43853-00-00 = x2 (two)
    Filter 69J-4381C-00-00 = x2 (two)
    Spacer 69G-4388F-00-00= x2 (two)

    I’d also suggest picking up one of these filters when you order the above parts. It is the large filter under the main housing covering all of the small hydraulic parts. Mine was almost completely deteriorated.

    69A-43816-01-00 = x1 (one)

    I ordered from Crowley and they had all but one of the parts. You might have to order from multiple sites to get all the parts. There are limited amounts of these parts, so expect to wait a few weeks for some of them.

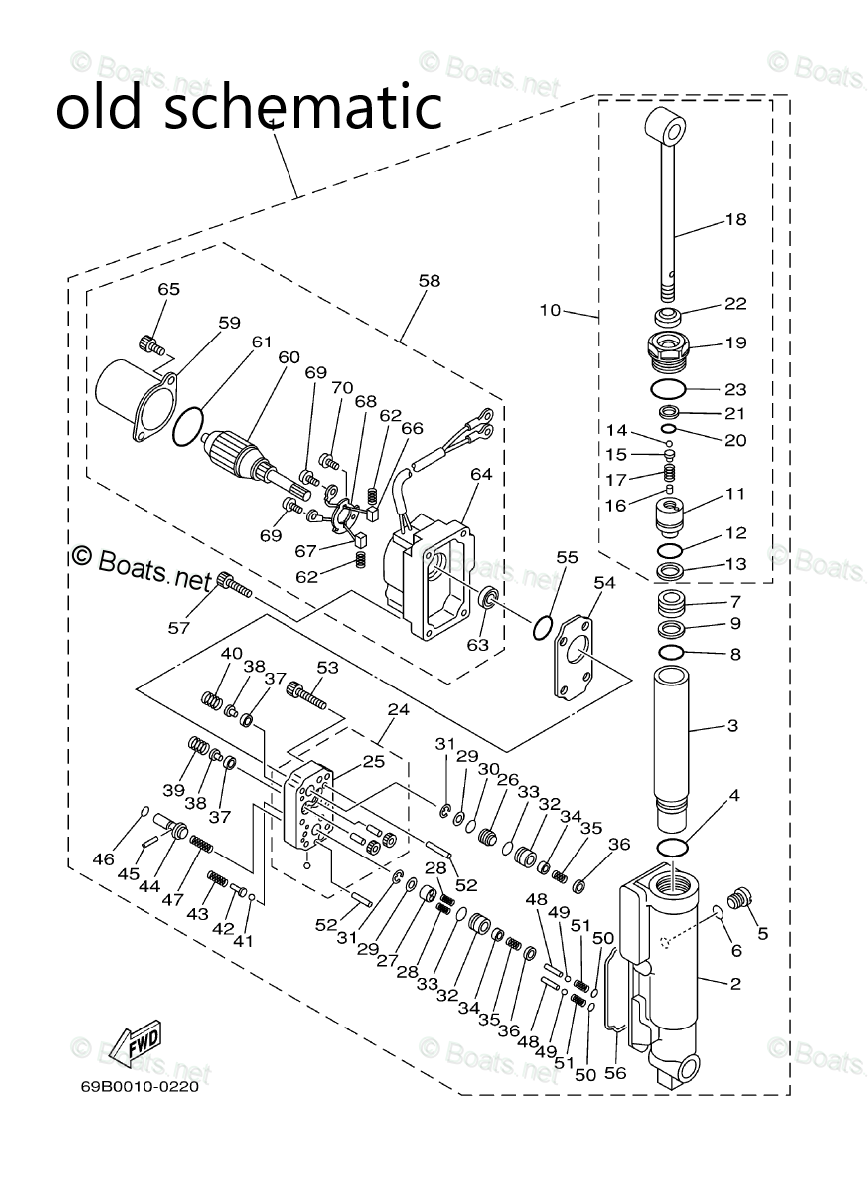
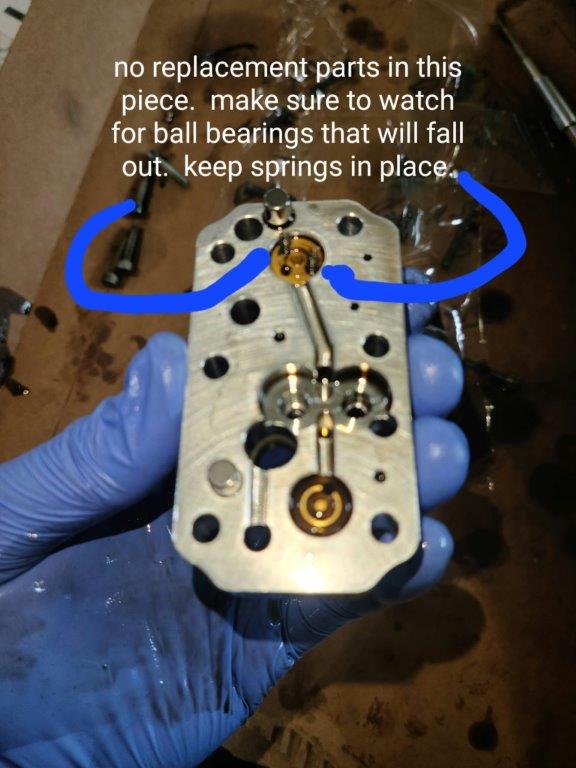
    As far as the repair itself is concerned, disassemble in a box or something with edges so parts don’t hit the floor. I’d suggest taking pictures from multiple angles of each piece as you take it apart as well. I drew a picture on cardboard and taped each spring, dowel, bolt, ball bearing, and valve to it so I knew exactly where things should go. This was valuable during reassembly. If parts randomly fall out, check the schematic for help. I’ve also attached some pictures for reference.

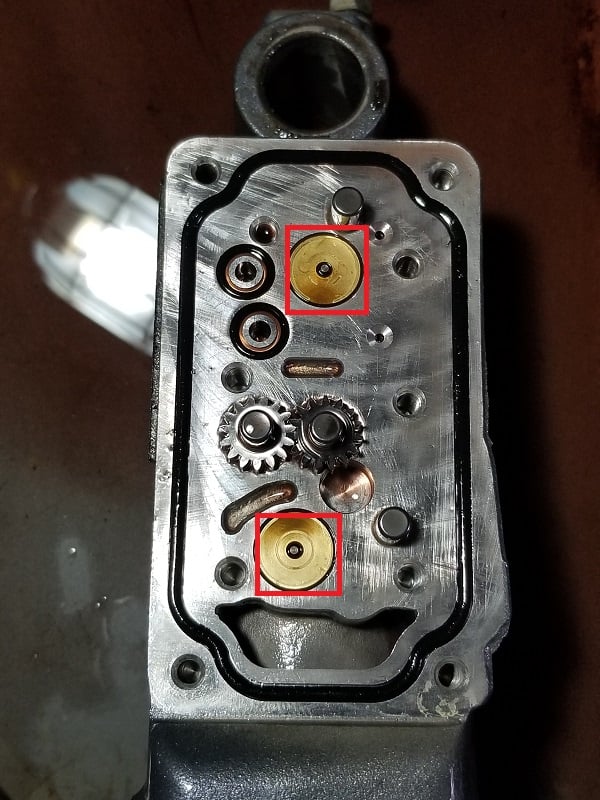
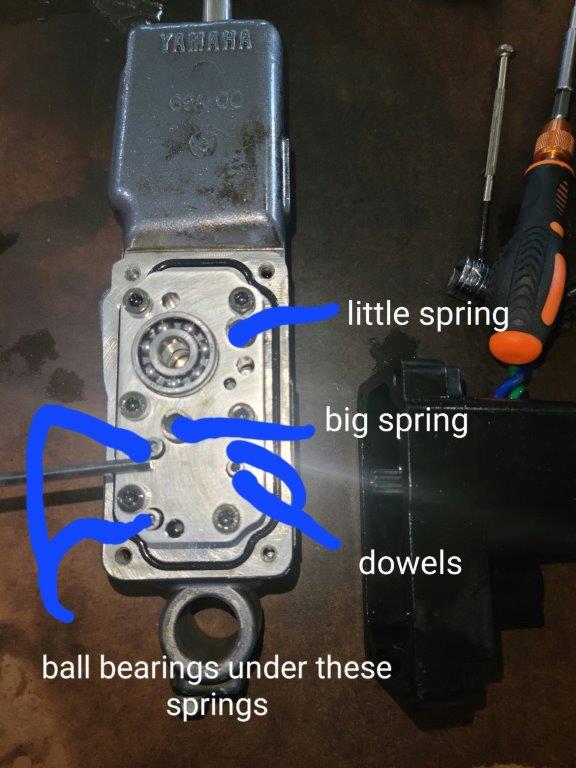
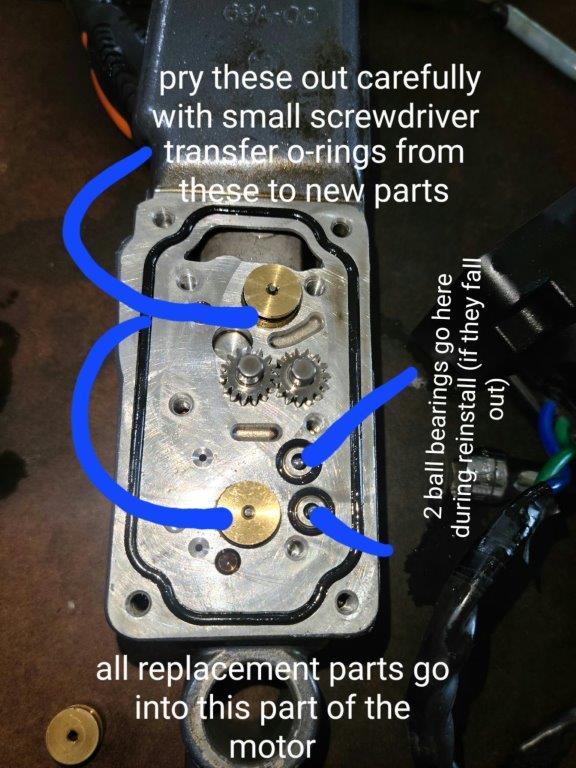
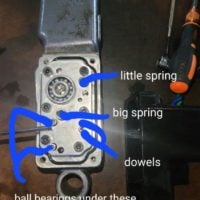
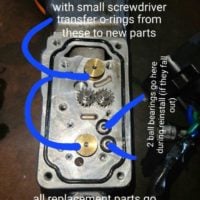
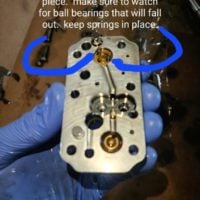
    One commenter noted difficulty removing the two brass colored valves in the main housing (where all replacement parts are installed). I used a very small screwdriver to push the center pin in and pried it out. It took some force to get it to move, so be careful as you don’t want to lose the center pin part of the assembly. Everything else is replaced, with an additional spacer added in (#72 on the newer schematic). You will see the holes in the small filters under these brass valves. That is the source of the problem. Install the new filters, spacers, springs, and valves. Remember to transfer the o-rings and the center pins from the old brass valves to the new ones (which are a bit shorter). Reassemble in reverse. Make sure two springs and two ball bearings go in the two holes surrounded by small o-rings. Also, make sure the two tiny springs in the middle section are set in place before attaching the middle section to the main section (see picture). Once the middle section of the assembly is back in place, the remaining springs, ball bearings, dowels, and allen bolts can be reinstalled. If you purchased the additional filter, that would be installed next before the main black housing is bolted back in place. Message me if you have questions. It is a challenging repair, but fairly quick if you have all the replacement parts on hand.

    Attachments:
    1. Untitled2.png

    2. 20220626_151339.jpg

    3. Untitled.gif

    4. 20220626_135155.jpg

    5. 20220626_135215.jpg

    Tom P.
    Whitehall Wi.
    Posts: 3452
    #2133169

    Glad this all worked out for you and the extra write up and pictures was a good touch. After doing the updated parts mine had worked flawlessly until this past winter ( 2021 ) when a snowplow backed into my boat and destroyed my T8.

Viewing 28 posts - 1 through 28 (of 28 total)

You must be logged in to reply to this topic.