Anybody do anything cool to their MX1825″s? Trying to get any and all ideas for cool modifications!
IDO » Forums » Fishing Forums » Toys for Big Boys » Skeeter Boats » MX 1825 Modifications
MX 1825 Modifications
-
 huskerdu
Posts: 592March 29, 2017 at 6:35 pm #1685096
huskerdu
Posts: 592March 29, 2017 at 6:35 pm #1685096You could add this, check with wife first.
Attachments:

image-3.png
 ?????
Posts: 299March 29, 2017 at 7:08 pm #1685102
?????
Posts: 299March 29, 2017 at 7:08 pm #1685102But that would cost more than the boat! Between divorce and the high maintainence I am out!!
March 30, 2017 at 8:31 am #1685192I removed the light pole board in the port side rod locker and installed the poles under the door, this gives much more storage space in the locker, just be careful if you use long rods as that board also protected the rod tips (I don’t use longer than 8′ rods so not an issue for me)
I made a drop in “Skeeter Day Box” like storage container that fits in the top of the bow baitwell (I loved that daybox storage in my old ZX225)
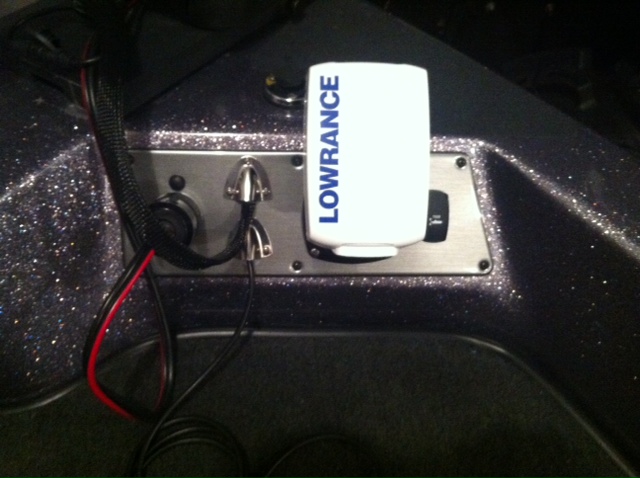
installed the bow fish finder mount to the bow plate resulting in a very clean install, no loose wires anywhere..
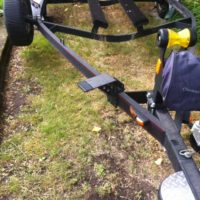
added a step on the trailer frame, Fulton F2 jackstand and Skeeter FX rims on the trailer.
My next mod will be some sort of Musky net holder that eliminates possible snags when you need to net a big fish…
March 30, 2017 at 8:39 am #1685195do you have pictures of the bow plate mount? x2 on the trailer step and jaskstand (with dual wheels), can move it by myself pretty easy and safely now. also added a turboswing last week install went pretty well, excited to try it out. ill try to post some pictures later.
March 30, 2017 at 9:54 am #1685222I think you guys touched on this already. On the side rod locker, you can take out the white shelves and shave off the bottom to lay another rod or 2 in the bottom.
I have seen deans boat put the batteries in the back (have to get sealed as they lay on their side) and you can use the batter box for tackle storage. Also would probably want trim tabs to keep the nose down.
I am also trying to figure out how to retrofit fans in the front compartments as well as add a “false floor” with holes in it to keep stuff off the bottom as well. To allow air flow through.
Joe, muskie net holder would be nice. I hate having to put it over the motor. I have also been leaning it against the driver seat when fishing…..I tend to keep the middle of the boat open so snagging anything is minimal but still happens.
I would like to get that trailer step not as nimble in the front as I use to be.
March 30, 2017 at 10:04 am #1685223Here’s a picture of the step I use, simple, cheap ($25) and quite effective vs the expensive 3 step trailer ladder Skeeter sells (of course I think the Skeeter ladder is better, but I couldn’t justify the $300+ price, personal opinion) Just to clarify, I removed the board piece inside the bow port rod locker that the boat light poles clamp onto, not the port side gunnel long rod locker.
Regarding the Fulton F2 Jackstand (this is for pre-2014 MX boats that did not have the F2 option) I went with the single larger wheel vs the dual wheel design, I read several reviews that said the dual wheels were prone to cracking due to the weight they have to support on the smaller wheels.
The FX rims are my favorite mod, love those rims!
Attachments:
trailer-step.jpg

IMG_3604.jpg
March 30, 2017 at 10:10 am #1685228Here’s my bow plate setup, I just use a simple depth finder up front (Lowrance Elite 5x) if you’re the type that uses a large SI/DI screen, then obviously this setup won’t work and you’ll likely use a large RAM mount… (I think this exact picture shows a smaller Elite-4 i put on just for the picture)
Attachments:

Bow-Electronics.jpg
?????
Posts: 299March 30, 2017 at 10:11 am #1685230The main modification I have made so far is I did not like the front graph setting out so I flushed it into the front bow. I have Garmin 93’s and simply made a flat piece out of starboard to cover the factory panel shaped it to fit and cut a hole for the graph, reused the existing screw holes to attach. Looks factory and is out of the way ansd still easy to see. When I get the boat outof storage I will post a picture.
March 30, 2017 at 10:12 am #1685231another tip is to use Plano 3600 boxes in the Starboard side gunnel storage, you can stack them 3 or 4 high on each level, this makes for a TON of tackle storage…Unfortunately I don’t have a picture of my specific setup
March 30, 2017 at 10:16 am #1685235The main modification I have made so far is I did not like the front graph setting out so I flushed it into the front bow. I have Garmin 93’s and simply made a flat piece out of starboard to cover the factory panel shaped it to fit and cut a hole for the graph, reused the existing screw holes to attach. Looks factory and is out of the way and still easy to see. When I get the boat out of storage I will post a picture.
I was going to have an powder coated aluminum plate fabricated for the same purpose, but because I use the smaller Lowrance unit I felt it wasn’t needed, I was also worried that the set angle of having a screen flush mounted could make for some unwanted glare angles.
March 30, 2017 at 4:14 pm #1685362Thanks guys! Keep them coming, going to do two of these mods this weekend!
March 30, 2017 at 7:36 pm #1685404Anybody do anything cool to their MX1825″s? Trying to get any and all ideas for cool modifications!
Could just give it to me for the summer that would be the coolest mod. By fall I would have enough holes drilled in to attach stuff that it would totally moded. May even find a way to store rods while running verses laying them down some place in the way. Like doing a little rework on the lids right in front of the consoles so you could actually stand up rods in holders.
March 31, 2017 at 8:05 am #1685478A couple of things I did that aren’t mentioned above:
Slid the spare tire up to the front cross member on the trailer (Where Joe put his step on the picture above). Doing that gave me the ability to see that fender light, and works great as a step when launching alone.Put weather stripping on all of the front deck door openings. Kept all the water out from rain or taking one over the bow. In adding the weather stripping, you will need to fur out the latches in able to open them. Take out the screws and the latch. Add enough stainless washers between the deck and the latch to be able to open the door more easily, yet retain a tight seal against the door.
I also caulked around the rubber molding in the the bow of the boat, again to keep water out.
Jami
March 31, 2017 at 9:12 am #1685510I’ve always thought that a 1/2 hour with an oscillating saw would make a sweet tiller out of a SC,,,,,,,,
HRG
April 3, 2017 at 4:28 pm #1686169I’ll send it your way Tom!!! On second thought, better check with Dean to see if any of your prescribed mods might void the warranty!!
 Thanks for all the input guys!April 3, 2017 at 4:54 pm #1686183
A couple of things I did that aren’t mentioned above:
Slid the spare tire up to the front cross member on the trailer (Where Joe put his step on the picture above). Doing that gave me the ability to see that fender light, and works great as a step when launching alone.Put weather stripping on all of the front deck door openings. Kept all the water out from rain or taking one over the bow. In adding the weather stripping, you will need to fur out the latches in able to open them. Take out the screws and the latch. Add enough stainless washers between the deck and the latch to be able to open the door more easily, yet retain a tight seal against the door.
I also caulked around the rubber molding in the the bow of the boat, again to keep water out.
Jami
Great stuff right here.
Out of curiosity what kid of weather striping are you using?
April 5, 2017 at 8:33 am #1686566Hmmmm, 3/8 or 3/16 self adhesive? Just the stuff you get at Menards/Ace. You’ll need 2 rolls to do the front if I remember correctly.
2-3 washers per screw per latch.I didn’t use the front livewell as a livewell, I used it to as storage. I put a Attwood Livewell bailer plug with snap handle on the transom inlet port. Kept water out in case i hit the wrong pump switch.
You will need to modify the black inlet port cover after you put the plug in. Just need to cut a couple of the splines in the middle of the cover as the plug sticks out a little longer than the cover will allow.
Jami
April 5, 2017 at 1:29 pm #1686632My MX has a shutoff valve in the front livewell – I too use it for storage. Definitely going to weatherstrip the front storage!
 May 1, 2017 at 9:10 am #1691586
Well I waterproofed the front per Jami’s suggestions. I didn’t need to fur out the latches. Might need to do one but the other is fine.
I also put silicone around the consoles where there are seams. Tapped the edges so you get a nice bead and you can push it in with your finger. Wear a latex glove of course for easy clean up.
Also made a bracket for my iTroll to mount under the gimble.
now my next addition is a blower fan for the front compartments.


Viewing 21 posts - 1 through 21 (of 21 total)
You must be logged in to reply to this topic.