As I sit at home, waiting anxiously for spring open water I got it in my head to do some prep work with my blade baits. I was able to find a great deal (buddy gave me) on blanks so I want to give a try painting them. Now in one of the shows I heard Eric R paints his own and my question to all is what type of paint and colors for pool 4? I’ve seen some threads on peoples choice of colors but do you just go to local hardware store and pick up a can of rustoleum of your colors? Just wanted to get some feed back from everyone. Thanks in advance.
IDO » Forums » Fishing Forums » Mississippi River » Mississippi River – Walleye » painting blade baits
painting blade baits
-
 Tom SawvellInactivePosts: 9559February 21, 2015 at 7:12 am #1514502
Randy Wieland paints tons of blades and does a real bang-up job.
February 21, 2015 at 8:30 am #1514527Thanks Tom
First and foremost, make sure your rattle can paint is compatible if you go that route. Myself along with so many others have made that mistake. Hit the isle and grab a can of primer, a base white, and a few hot colors. Only to have the paint blister because one is not compatible with the other.
A few years ago, I went 100% air brushed powder paints. A lot more work up front, but I think the results are fantastic. I get the majority of my paints through http://www.allpowderpaints.com/
My basic set up:
Badger Abrasive air gun
24 extra jars (4oz I think)
Hobby compressor with a fine adjustment for pressure
Convection toaster oven
Adjustable heat gun
Torch
Quality face mask
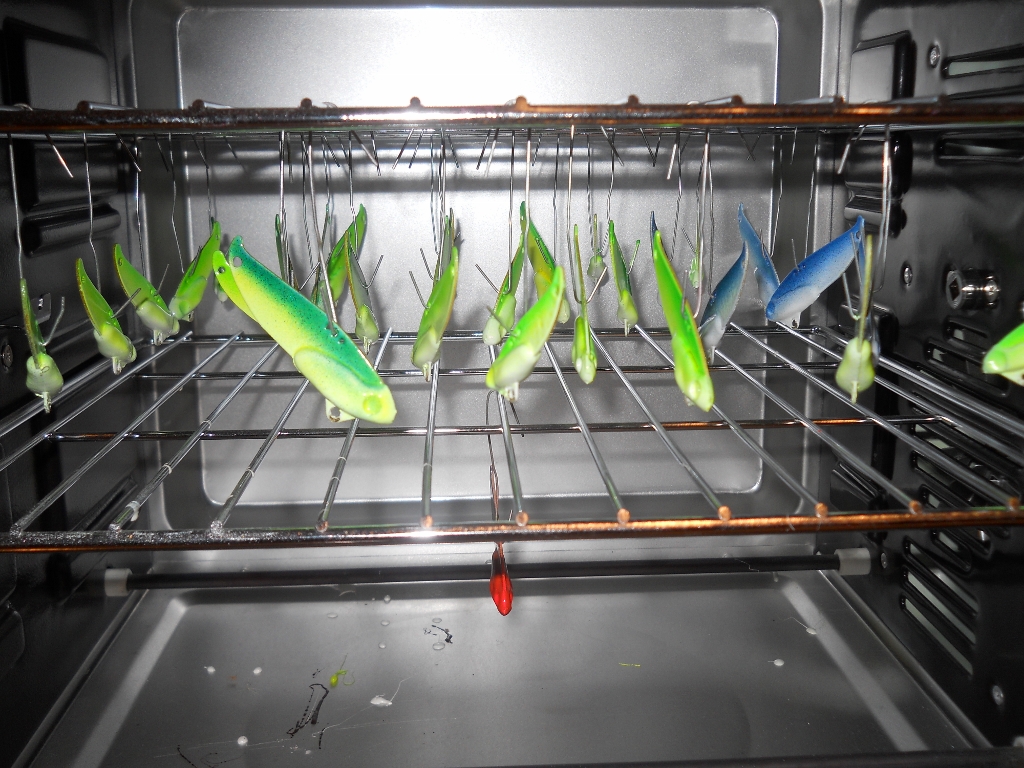
I have a deep box I line with a garbage bag to catch my over spray (per color) and can recycle the unused paint from in there. You just need to keep it clean. With hemo’s, I heat the blade almost to the point of the lead begining to melt (you’ll see the color difference in the lead). Spray one side and the bottom, re-heat a little more and spray the other side. You may need to warm it up a little more and touch up – This with my base white I use.I use paper clips as hanging hooks for in the rack of the oven. Depending if I want a color to bleed or not, determines if I bake them right away. Most powders are metal temps at about 400 @ 15 minutes – +/-
After I base coat the first hundred or so, I split them up by color. Clean out my gun then run my next color run, and so on until I have them done. There is a learning curve to get the hang of the angle and distance to spray from. But after awhile, and a thousand or so, you can do them in your sleep.
Powder will give you two things 1. color/fleck you won’t get from rattle cans 2. A durable finish that can bounce off of rocks, sea walls, asphalt,…and not immediately chip or scratch off.
If you get bigger into powder paints I recommend a cheap exhaust hood ducted to the outside of your garage. The fine dust stays airborne and will settle of stuff. Keep in mind that with guiding, I burn through 200-300 a year. So when i make/paint them. its a production run for a couple days. I avoid dipping blades in powder because it is too easy to get way too much paint on them.
Attachments:

DSCN5485-1024x768.jpg

DSCN5496-1024x768.jpg

DSCN5483-1024x7681.jpg

DSCN5488-1024x7681.jpg
April 28, 2015 at 12:46 pm #1538894Hey Randy this has been great info and I’m starting to see it come together but the only thing I can’t imagine is the spray booth with the bag catcher for recycling. Would you by any chance have a picture or description explaining this further? Keep up the good work those blades look awesome and the info provided is spot on, thank you!
April 28, 2015 at 6:09 pm #1539011Take a big bag and rub it together fast to build up static electricity. Place the bag into a box, then spray 1 color into it. Your best off using 1 bag per color. The thinner mil bags build up the static better than the thicker mil.
April 29, 2015 at 9:43 am #1539212Like raynestorm stated, I line a box with painters plastic or kitchen garbage bags – and YES 1 COLOR at a time. I use some duct tape doubled over to adhere the plastic into the corners to keep it spread open. After i do a long run of painting or go to change colors, I simply remove the plastic and tap all the powder to one corner, cuyt open and pour back into the bottle. Keep it clean and you can re-use it.
April 29, 2015 at 10:49 am #1539235Awesome looking blades Randy! Just curious if you notice any difference in the vibration from the blade doing it this way?
I have tried to dip a couple with powder just testing in the past and it all but killed the action. You must like it if you are painting up that many :). The blades have been hot for me this spring, smallies have been tearing em up.
Thanks Randy.April 29, 2015 at 11:06 am #1539242Key is thin layers. I don’t think there is a better way than airbrushing. I dipped a couple and they sucked donkey dung. FYI – the Firecracker that is base white with Red, Blue, and silver fleck is baked white, airbrushed clear, heated, dipped in the fleck mix, lightly heated again, then DIPPED in clear. Action is good for a bulky blade
April 29, 2015 at 1:44 pm #1539333” I burn through 200-300 a year.”
I think I went through that many the last time I tried blades. It was a bad day
 April 30, 2015 at 12:45 pm #1539725
Thanks a lot Randy, appreciate it. I’ll have to give a shot and that firecracker sounds good.
Hey Steve, the other guys on here can tell you much better then me on technique but here is a little thing that has helped me a a lot.
Hold the blade like it is going through the water, now look at the trebles.
There should be one hook on the treble that points to the front of the bait, take a wire cutter and clip it off flush to the meeting place of the 3 hooks.You should have 2 hooks on the treble pointing to the back of the blade. Been doing this for years even on cranks cause I fish a lot of rip rap rock and it really helps to limit snags. I have not noticed it make much difference in losing fish, yeah a couple but I’ll take the trade off. You can run that bait over your finger and rarely get hooked.
Hope that helps some cause it is a fun way to fish if you get it down and times more productive then jigs.
April 30, 2015 at 12:54 pm #1539732Thanks a lot Randy, appreciate it. I’ll have to give a shot and that firecracker sounds good.
Hey Steve, the other guys on here can tell you much better then me on technique but here is a little thing that has helped me a a lot.
Hold the blade like it is going through the water, now look at the trebles.
There should be one hook on the treble that points to the front of the bait, take a wire cutter and clip it off flush to the meeting place of the 3 hooks.You should have 2 hooks on the treble pointing to the back of the blade. Been doing this for years even on cranks cause I fish a lot of rip rap rock and it really helps to limit snags. I have not noticed it make much difference in losing fish, yeah a couple but I’ll take the trade off. You can run that bait over your finger and rarely get hooked.
Hope that helps some cause it is a fun way to fish if you get it down and times more productive then jigs.
Thanks for the tip! Yea I had pretty much given up on blades, they’d maybe last for three or four casts and then they’re hung up. I’ve never caught anything on a blade, usually because they don’t last long enough. I’m going to try your suggestion
 April 30, 2015 at 3:21 pm #1539810
When you have clients pitching them into tree tops, not much you can do
May 1, 2015 at 12:41 pm #1540097I tried painting a few old crank baits with rustoleum spray paints and it worked pretty good to be honest.. Its not the best way but worked good for a quick backyard job when in a pinch. No cleanup. If your doing a lot I would not recommend it. I am trying to add a couple pictures but challenged today.
Attachments:

DT-7s.jpg
May 3, 2015 at 9:38 pm #1540613Steve I really hope it helps. Only other things I might suggest would be to use a little faster cadence in snaggy areas and give it some time to get use to it. I had to leave my jig rod at home a couple times to stop from giving up trying the blade lol but glad I did. One more trick in the bag.
I had some trouble with hooks fouling up in the current so I use a 20 # mono leader and swivel with my braid and that helped me out with that problem but shorter hooks would probably do the same.
Hahaha Randy, no matter how many times my dad tells me there are no fish in the trees up there I have to keep trying! Those dang blades are like bullets.
Nice looking cranks Buschman!


Viewing 15 posts - 1 through 15 (of 15 total)
You must be logged in to reply to this topic.